


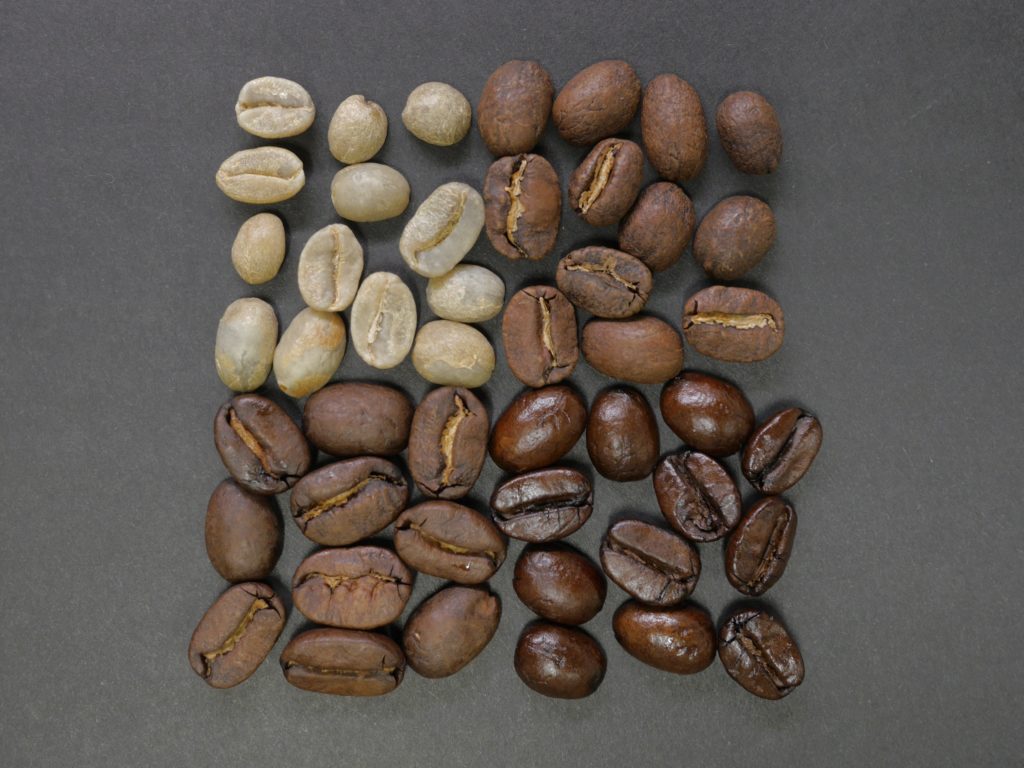
Several reactions occur inside coffee bean during roasting. The beans transform physically and chemically, resulting in the change in colour from light green to brown and the development of the flavour. Some flavours are broken down while some are developed into the desire flavour. A good roaster need to understand these changes to get the taste he wants, and this edition of CTI brings you the basics of flavour development from Mr. Sarawut Premchit, SCAA Roasting Specialized Instructor from Intercof Co., Ltd.
Before the beans go into the machine, the machine should be set at the right initial temperature, or the Charge Temperature (CT).
The temperature will drop after the beans are loaded into the machine. The time taken to reach the lowest point of this drop in temperature is called the turning point, in which the temperature will rise back after this point. A good roasting machine would give you a guide on the charge temperature and the suggested volume of the beans.
For example, a 5 kg batch should have the charge temperature at 200°C and 1 minute turning point. But if the volume changes to 3 kg, the turning point may reduce to 50 seconds at charge temperature of 200°C. In this case, charge temperature should vbe reduce in order to maintain the turning point at 1 minute.
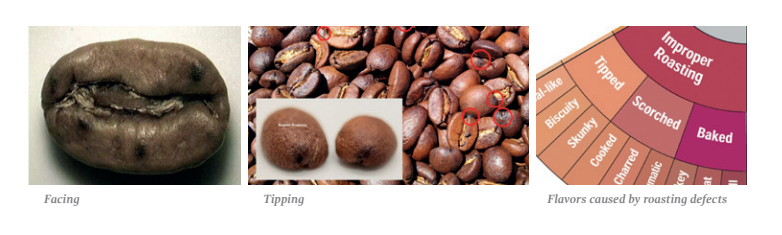
CT has a huge effect on the coffee beans. Incorrect setting could lead to roasting defects like facing, scorching, and tipping which could introduce burnt or smoky flavours to the beans. These defects can be observed by eyes if your CT is too high.
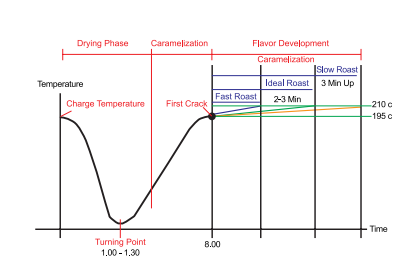
After turning point, the temperature rises to 193-195 °C where first crack occurs, past the drying phase where the beans change from green to yellow, and past the point of Maillard re?action (around 154 °C) which turns the beans from yellow to brown. Mailard reaction or browning reaction breaks down sugar (Glucose,Fructose, Maltose, etc.) until the temperature reaches 160-200 °C during which caramelization occurs (cara?melization of Sucrose, Fructose, Glucose, Maltose, etc.). After this point, Flavour Development phase kicks in and determine the coffee flavour.
Flavour Development
Fast Roast: High acidity
Example After the first crack at 195°C at the 8th minute, if we continue to roast the beans to 210°C until the timer says 9 minute 50 second, we will have the development time of 1 minute 50 second and a fast roast coffee.
Ideal Roast: Balanced acidity and sweetness and body
Starting at the same first crack (195°C at 8th minute), continue roasting to 10 minute 30 second. The development time here is 2 minute 30 second, but we have to decrease the heat and maintain the temperature at 210 °C throughout the development time. The colour will be similar to fast roast, but it’ll be less acidic but sweeter. This is the answer to why coffee beans with similar colour have different taste.
Slow Roast: If we are roasting for Italians who does not like acidity, reduce the heat after the first crack at 8th minute and roast until 11 minute 25 second. We should have the finishing roast temperature at 210 °C and the development time of 3 minute 25 second. The result should be a mildly sweet and bitter coffee with thicker body and no acidity.
All 3 kind of coffee beans have similar colour and it’s near impossible to determine their taste just by looking. If we continue to roast after slow roast, the coffee will get more bitter and burn.
The example shows how important flavour develop?ment is. It’s essential to pay attention to the time and temperature after the first crack in order to control the flavour, especially if we are roasting specialty coffee. For example, if we want to highlight the acidity of a Geisha and we use slow roast approach, the coffee will lose the acidity and it’ll be a waste of good coffee.
Roaster experience is critical as you need to know the beans you are roasting. What variety is it? How was it processed? How dense is it? What is its moisture content? You need to understand the beans for you to bring out its desired character.
For instance, Kenyan coffee is denser and it requires higher finishing temperature. Normally we want to bring out the chocolate and floral character of Kenyan beans out with a little acidity, so an ideal roast with 2 minute 20 second development time would be the approach. The result would be a balance roast with balanced acidity, sweetness, and bitterness.
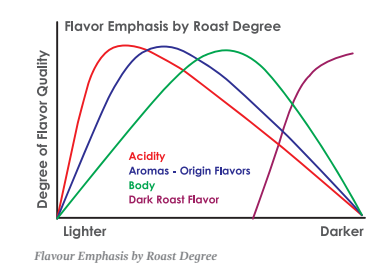
Sometimes customers ask for an impossible roast, for example, a very acidic coffee with body. But according to the graph, body builds up as acidity decreases.
3 Must-dos for roasters
- Weigh the beans
Weigh all the beans you want to roast to determine the starting charge temperature and the weight lost. Coffee beans lose 15% – 20% of weight after roasting. To calculate the loss, use the following formula. L=(G-R)/G; L= Loss, G = Green beans weight, R = Roasted beans weight Example: 5 kg of green beans give 4.2 kg of roasted beans, then the loss equals L=(G-R)/G=(5-4.2)/5=0.16 or 16%. If the loss is too high, it might point to some problems like excessive roasting temperature or the moisture content is off. Since coffee is sold by weight, weight loss is an important subject to consider every time you roast.
- Measure the Moisture Content
Use a Moisture Meter to determine the moisture content of the beans you want to roast. Arabica beans should have the moisture content between 11-12% and robusta beans should have the moisture content around 13%. Moisture content affects coffee flavour and the time to reach the first crack, which in turns affect caramelization and flavour development phases. It’s all connected!
- Measure the beans density (Bulk Density Testing)
You’ll need a graduated cylinder to determine the density of the beans as denser beans require higher temperature. Fill the cylinder with the beans to measure the volume and weigh the beans. Use the following formula to determine the density. Density=Volume(ml)/Weight(g). *** If possible, Green Bean Grading and Screen Size Check are another 2 steps you could do before roasting.


NO COMMENT